NOTE:
• If the limited slip differential clutch set was replaced,
the 65 mm shim (differential housing cover side) and
112 mm shim (differential housing cover side) must
be adjusted.
• Reassemble the parts in the same order and direction
they were before disassembly.
• Lubricate the clutch disc surface with transmission oil.
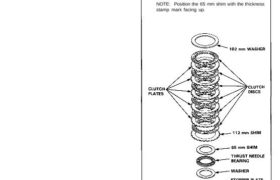
1. Reassemble the parts as shown below.
NOTE: Position the 65 mm shim with the thickness
stamp mark facing up.
Differential
Differential
Reassembly
2. Install the carrier assembly.
CARRIER
ASSEMBLY
DIFFERENTIAL
HOUSING
3. Install the final driven gear.
NOTE: Align the mark on the differential housing
cover with the mark on the final driven gear.
FINAL DRIVEN GEAR
MARK
4. Install the washers, thrust needle bearing, and cen-
tral gear.
CENTRAL GEAR
WASHERS
THRUST NEEDLE
BEARING
• 65 mm shim adjustment
5. Clean the gear end surface on the central gear.
6. Set the plastigauge (Blue) strip on the central gear
at four points in a crisscross pattern.
PLASTIGAUGES
MARK
7. Install the washer, thrust needle bearing, 65 mm
shim, 112 mm shim, clutch disc, and spring plate.
NOTE:
• Be careful not to move the plastigauge when in-
stalling the washer.
• Position the 65 mm shim with the thickness
stamp mark facing up.
SPRING
PLATE
CLUTCH
DISC
112 mm SHIM
65 mm SHIM
THRUST NEEDLE
BEARING
WASHER
Align the marks, then install the differential housing
cover.
DIFFERENTIAL HOUSING
COVER
MARK
MARK
9. Tighten the mounting bolts in a crisscross pattern
in several steps.
8 x 1.0 mm SPECIAL BOLTS
40 N-m (4.0 kg-m, 29 Ib-ft)
BENCH
VISE DIFFERENTIAL
INSPECTION TOOLS
07MAJ-PR90100
10. Remove the parts shown below.
DIFFERENTIAL
HOUSING
COVER
CLUTCH DISC
112 mm SHIM
65 mm SHIM
THRUST NEEDLE
BEARING
WASHER
SPRING PLATE
Differential
Reassembly
11. Measure the widest part of the plastigauge.
Standard: 0.18-0.229 mm
PLASTIGAUGE STRIP
• If the plastigauge measures within the standard,
go to step 14.
• If the plastigauge does not measure within the
standard, continue with step 12.
12. Select the proper 65 mm shim based on the follow-
ing table.
• If the measurement was less than 0.18 mm, in-
stall a thinner shim.
• If the measurement was more than 0.229 mm,
install a thicker shim.
65 mm shim
13. After installing a thinner or thicker shim, be sure to
recheck the measurement with plastigauge.
• After installing a thinner shim:
If the measured value is less than 0.18 mm, select
the next thinner shim, and recheck.
If the new value is more than 0.229 mm, the
selected shim is OK.
• After installing a thicker shim:
If the measured value is more than 0.229 mm,
select the next thicker shim, and recheck.
If the new value is less than 0.18 mm, take the
shim you chose at the step 12.
14. Install the washer, thrust needle bearing, 65 mm
shim, 112 mm shim, clutch plate, clutch disc, and
spring plate.
NOTE: Position the 65 mm shim with the thickness
stamp mark facing up.
SPRING
PLATE
CLUTCH
DISC
112 mm SHIM
65 mm SHIM
THRUST NEEDLE
BEARING
WASHER
15. Align the marks, then install the differential housing
cover.
DIFFERENTIAL HOUSING
COVER
MARK
MARK
16. Tighten the mounting bolts in a crisscross pattern
in several steps.
8 x 1.0 mm SPECIAL BOLTS
40 N-m (4.0 kg-m, 29 Ib-ft)
BENCH
VISE DIFFERENTIAL
INSPECTION TOOLS
07MAJ-PR90100
• 112 mm shim adjustment
17. Measure the preset torque (see page 15-4).
Standard: 60-140 N-m (6-14 kg-m,
43-101 Ib-ft)
112 mm SHIM
Standard shim
If the preset torque is more than the standard,
select a thinner 112 mm shim, and recheck the
preset torque.
If the preset torque is less than the standard,
select a thicker 112 mm shim, and recheck the
preset torque.