Category: Cylinder Head & Valve Train
nsxd06023a.pdf
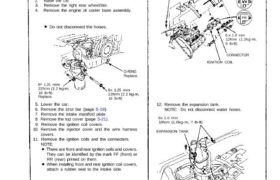
13. Remove the breather hose, and the air cleaner case (page 5-22). (cont’d) WATER HOSES Do not disconnect. EXPANSION TANK 12. Remove the expansion tank. NOTE: Do not disconnect water hoses. 6x 1.0 mm 10N.m (1.0kg-m, 7 Ib-ft) IGNITION COIL CONNECTOR 6 x 1.0 mm 12N.m (1.2kg-m, 9 Ib-ft) 6×1.0 mm 12 N.m (1.2 kg-m. […]
nsxd06043a.pdf
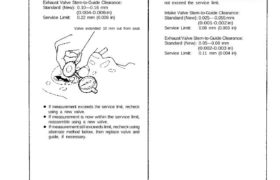
Valve Guides Valve Movement Measure the guide-to-stem clearance with a dial indica- tor while rocking the stem in the direction of normal thrust (wobble method). Intake Vaive Stem-to-Guide Clearance: Standard (New): 0.05—0.11 mm (0.002-0.004 in) Service Limit: 0.16 mm (0.006 in) Exhaust Valve Stem-to-Guide Clearance: Standard (New): 0.10—0.16 mm (0.004-0.006 in) Service Limit: 0.22 mm […]
nsxb06041a.pdf
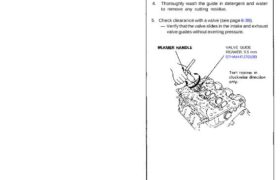
Reaming NOTE: For new valve guides only. 1. Coat both reamer and valve guide with cutting oil. 2. Rotate the reamer clockwise the full length of the valve guide bore. 3. Continue to rotate the reamer clockwise while removing it from the bore. 4. Thoroughly wash the guide in detergent and water to remove any […]
nsxb06013a.pdf
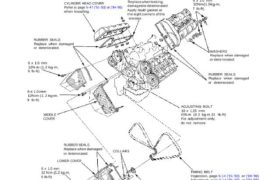
Timing Belt Illustrated Index NOTE: Refer to page 6-18 (’91-’93) or (’94-’96) for positioning crankshaft and pulley before installing the belt. if it is to be reused, mark the direction of rotation on the belt before removing. Do not use the middle cover and lower cover for storing removed items. Clean the middle cover and […]
nsxb06036a.pdf
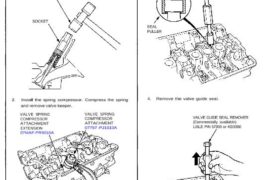
Valves, Valve Springs and Valve Seals Replacement NOTE: Identify valves and valve springs as they are re- moved so that each item can be reinstalled in its original position. 1. Using an appropriate-sized socket and plastic mallet, lightly tap the valve retainer to loosen the valve keep- ers before installing the valve spring compressor. PLASTIC […]
nsxb06012a.pdf
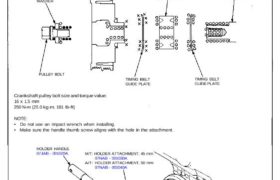
Crankshaft Pulley and Pulley Bolt Replacement When installing and tightening the pulley, follow the procedure below. Clean, remove any oil and lubricate points shown below. Clean Remove any oil Lubricate CRANKSHAFT PULLEY WASHER PULLEY BOLT TIMING BELT DRIVE PULLEY CRANKSHAFT TIMING BELT GUIDE PLATE TIMING BELT GUIDE PLATE Crankshaft pulley bolt size and torque value: […]
nsxd06027a.pdf
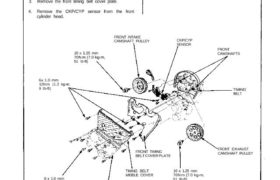
Crankshaft Position (CKP)/Cylinder Position (CYP) Sensor NOTE: Turn the crankshaft so that the No. 1 piston is at top dead center (page 6-25, 26). 1. Remove the timing belt (page 6-23, 24). 2. Remove the front intake and exhaust camshaft pulleys. 3. Remove the front timing belt cover plate. 4. Remove the CKP/CYP sensor from […]
nsxd06036a.pdf
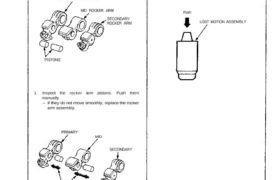
Rocker Arms and Lost Motion Assemblies Inspection NOTE: When reassembling the primary rocker arm, care- fully apply air pressure to the oil passage of the rocker arm. PRIMARY ROCKER ARM MID ROCKER ARM SECONDARY ROCKER ARM PISTONS 1. Inspect the rocker arm pistons. Push them manually. PRIMARY MID SECONDARY Apply oil to the pistons when […]
nsxb06018a.pdf
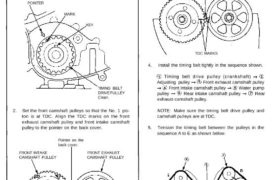
Timing Belt Installation Install the timing belt in the reverse order of removal; Only key points are described here. NOTE: Clean the middle and lower covers before instal- lation. 1. Set the timing belt drive pulley so that the No. 1 pis- ton is at top dead center (TDC). Align the mark on the teeth […]
nsxb06014a.pdf
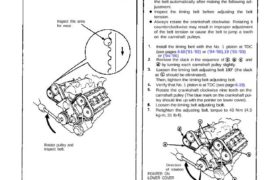
Timing Belt Inspection 1. Remove the ignition coil covers and harness clamps. 2. Disconnect the connectors, then remove the ignition coils. 3. Remove the cylinder head covers, 4. Inspect the timing belt for cracks and coolant or oil soaking. NOTE: Replace the belt if coolant or oil soaked. Remove any oil or solvent that gets […]