Category: Electrical
nsxb23212a.pdf
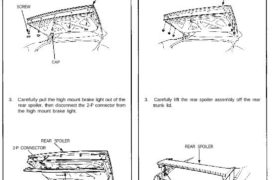
Brake Lights High Mount Brake Light Replacement CAUTION: Be careful not to damage the high mount brake light, rear spoiler, and trunk lid. 1. Open the trunk lid. 2. Remove the caps and five screws from the rear spoiler. REAR SPOILER SCREW CAP 3. Carefully pull the high mount brake light out of the rear […]
nsxb23278a.pdf
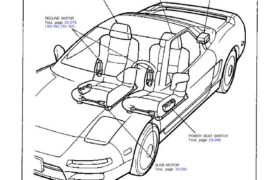
Power Seats Component Location Index PASSENGER’S SEAT DRIVER’S SEAT RECLINE MOTOR Test, page 23-273 (’93-’96) (’91-’92) ENGINE COMPARTMENT FUSE/RELAY BOX SLIDE MOTOR Test, page 23-281 POWER SEAT SWITCH Test, page 23-280 Attachments nsxb23278a (49 kB)
nsxd23094a.pdf
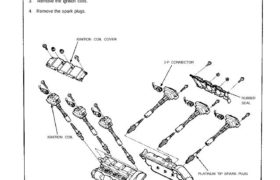
Ignition System Ignition Coils/Spark Plugs Removal CAUTION: Ignition coils and spark plugs can become very hot in use, do not touch them until the engine has cooled down. 1. Remove the ignition coil covers. 2. Disconnect the 2-P connectors from the ignition coils. 3. Remove the ignition coils. 4. Remove the spark plugs. IGNITION COIL […]
nsxe23259a.pdf
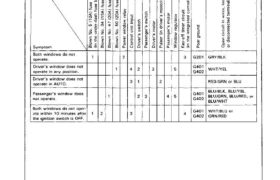
Troubleshooting NOTE: The numbers in the table show the troubleshooting sequence. Main Menu Table of Contents Troubleshooting NOTE: The numbers in the table show the troubleshooting sequence. Item to be inspected in the under— relay box or disconnected terminals Blown No. 47 (20A) fuse hood fuse/ Open circuit in wires, loose Blown No. 5 (10A) […]
nsxe23172a.pdf
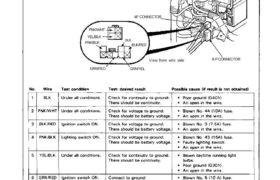
Lighting System Daytime Running Lights Control Unit Input Test Remove the glove box lower panel and glove box. Disconnect the 8-P and 4-P connectors from the daytime running lights control unit. Make the following input tests at the connector termi- nals. If all tests prove OK, yet the system still fails to work, replace the […]
nsxb23224a.pdf
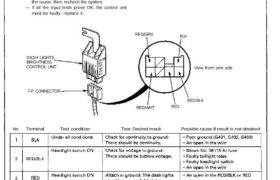
Dash Lights Brightness Control Control Unit Input Test 1. Disconnect the 7-P connector from the control unit. 2. Inspect the connector and socket terminals to be sure they are all making good contact. • If the terminals are bent, loose or corroded, repair them as necessary, and recheck the system. • If the terminals look […]
nsxd23296a.pdf
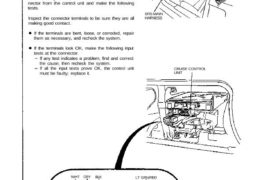
Cruise Control Control Unit Input Test CAUTION: AH SRS wiring harnesses are covered with yellow outer Insulation. Before disconnecting any part of the SRS wire harness, install the short connectors (see page 24-10). Replace the entire affected SRS harness assembly if it has an open circuit or damaged wiring. Remove the glove box, then disconnect […]
nsxb23097a.pdf
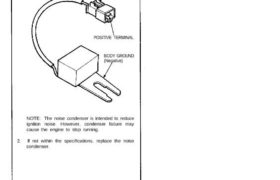
Noise Condenser Capacity Test 1. Use a commercially available condenser tester. Con- nect the tester probes and measure the condenser capacity. Condenser capacity: 0.47 ± 0.09 microfarads POSITIVE TERMINAL BODY GROUND (Negative) NOTE: The noise condenser is intended to reduce ignition noise. However, condenser failure may cause the engine to stop running. 2. If not […]
nsxb23156a.pdf
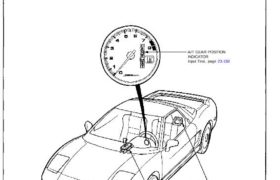
A/T Gear Position Indicator Component Location Index SRS components are located in this area. Review the SRS component locations, precautions, and procedures in the SRS section 24 before performing repairs or ser- vice. NOTE: For indicator troubleshooting, refer to sec- tion 14. A/T GEAR POSITION INDICATOR Input Test, page 23-158 TRANSMISSION CONTROL MODULE (TCM) See […]
nsxb23144a.pdf
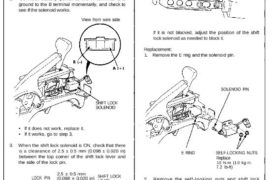
Interlock System Shift Lock Solenoid Test/Replacement Test: 1. Remove the console, then disconnect the 3-P con- nector of the shift lock solenoid from the floor wire harness. NOTE: This solenoid has a diode in it. To get an accurate reading, either test it with a volt-ohmmeter that compensates for diodes, or make sure you con- […]