Category: Brakes & ABS
Categories
nsxb19004a.pdf
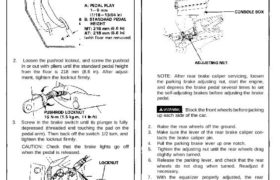
Pedal Height Adjustment 1. Loosen the brake switch locknut, and back off the brake switch until it is no longer touching the brake pedal. 2. Loosen the pushrod locknut, and screw the pushrod in or out with pliers until the standard pedal height from the floor is 218 mm (8.6 in). After adjust- ment, tighten […]
Categories
nsxb19072a.pdf
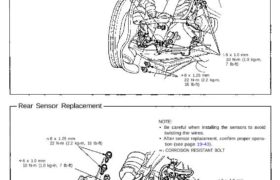
Pulsers/Sensors Front Sensor Replacement NOTE: • Be careful when installing the sensors to avoid twisting the wires. • After sensor replacement confirm proper opera- tion (see page 19-43). CORROSION RESISTANT BOLT 6 x 1.0 mm 10 N-m (1.0 kg-m. 7 Ib-ft) 6 x 1.0 mm 10 N-m (1.0 kg-m, 7 Ib-ft) 8 x 1.25 mm […]
Categories
nsxe19063a.pdf
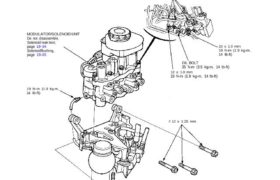
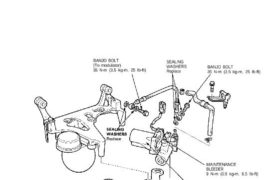
Modulator/Solenoid Unit Index/Torque CAUTION: Do not damage the brake pipes when removing the spare tire and modulator/solenoid unit. Do not spill brake fluid on the car; it may damage the paint; if brake fluid does contact the paint, wash it off immediate- ly with water. CORROSION RESISTANT BOLT 19 N·m (1.9 kg-m. 14 Ib-ft) MODULATOR/SOLENOID […]
Categories
nsxb19041a.pdf
ALB Checker Function Test NOTE: • The ALB checker is designed to confirm proper operation of the anti-lock brake system (ABS) by simulating each system function and operating con- dition. Before using the checker, confirm that the anti-lock brake system (ABS) indicator light is not in- dicating some other problem with the system. The light […]
Categories
nsxb19066a.pdf
Power Unit Torque/Inspection CAUTION: • Do not attempt to disassemble the power unit ex- cept for those components shown in this illustration. • Do not spill brake fluid on the car; it may damage the paint; if brake fluid does contact the paint, wash it off immediately with water. • To prevent spills, cover the […]
Categories
nsxb19108a.pdf
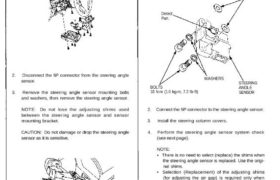
Electronic Components Steering Angle Sensor Replacement Removal 1. Remove the steering column covers. Installation 1. Install the steering angle sensor by tightening two bolts, and make sure the adjusting shims are installed properly. CAUTION: Do not apply any grease or oil to the adjusting shim. Detect Part. ADJUSTING SHIMS 2. Disconnect the 5P connector from […]
Categories
nsxb19086a.pdf
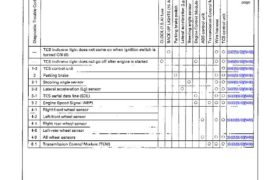
Troubleshooting Troubleshooting Guide Refer to page 19-87(’91-’93)(”94-’96) 19-89(’91-’93)(’94-’96) 19-90(’91-’93)(’94-’96) 19-91(’91-’93)(’94-’96) 19-94(’91-’93)(’94-’96) 19-97(’91-’93)(’94-’96) 19-100 (’91-’93)(’94-’96) 19-102 (’91-’93)(’94-’96) 19-103 (’91-’93)(’94-’96) 19-105 (’91-’93)(’94-’96) 19-106 (’91-’93)(’94-’96) Main Menu Table of Contents Troubleshooting — Troubleshooting Guide Related components š u ⋃ A Б 3 Ё š “Ë Refer j; System Indicated E Ë ш “8 to E ä 3’ ↼ […]
Categories
nsxb19068a.pdf
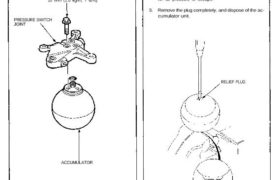
Accumulator/Pressure Switch Accumulator/Pressure Switch Removal 1. Drain the high pressure brake fluid from the power unit (see page 19-62). 2. Remove three 6 mm flange bolts, then remove the accumulator from the pressure switch joint. 6 x 1.0 mm 10 N-m (1.0 kg-m, 7 Ib-ft) PRESSURE SWITCH JOINT ACCUMULATOR Accumulator Disposal The accumulator contains high-pressure […]
Categories
nsxb19008a.pdf
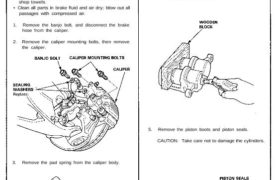
Front Caliper Disassembly • Never use an air hose or dry brush to clean brake assemblies. • Use an OSHA-approved vacuum cleaner to avoid breathing brake dust. CAUTION: • Do not spill brake fluid on the car; it may damage the paint; if brake fluid does contact the paint, wash it off immediately with water. […]
Categories
nsxb19064a.pdf
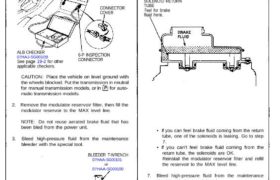
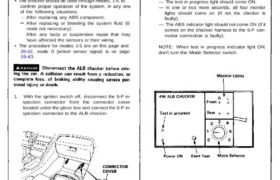
Modulator/Solenoid Unit Solenoid Leak Test 1. Disconnect the 6-P inspection connector (PNK) from the connector cover located under the glove box, and connect the 6-P inspection connector to the ALB checker. CONNECTOR COVER ALB CHECKER 07HAJ-SG0010B See page 19-2 for other applicable checkers. 6-P INSPECTION CONNECTOR CAUTION: Place the vehicle on level ground with the […]