Under-dash Fuse Box
CAUTION:
All SRS wiring harnesses are covered with yellow
outer insulation.
Before disconnecting any part of the SRS wire
harness, install the short connectors (see page
24-10 (’93-’96)).
Replace the entire affected SRS harness assembly if
it has an open circuit or damaged wiring.
SRS MAIN
HARNESS
Removal:
1. Disconnect both the negative cable and positive
cable from the battery.
2. Carefully remove the side sill pad (pull it up. rear
end first).
3. Remove the fuse box door.
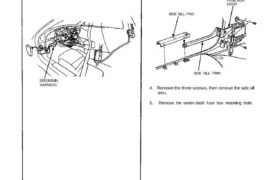
FUSE BOX
DOOR
SIDE SILL PAD
SIDE SILL TRIM
4. Remove the three screws, then remove the side sill
trim.
5. Remove the under-dash fuse box mounting bolts.
Removal/Installation
CAUTION:
All SRS wiring harnesses are covered with yellow
outer insulation.
Before disconnecting any part of the SRS wire
harness, install the short connectors (see page
24-10 (’93-’96)).
Replace the entire affected SRS harness assembly if
it has an open circuit or damaged wiring.
SRS MAIN
HARNESS
Removal:
1. Disconnect both the negative cable and positive
cable from the battery.
2. Carefully remove the side sill pad (pull it up. rear
end first).
3. Remove the fuse box door.
FUSE BOX
DOOR
SIDE SILL PAD
SIDE SILL TRIM
4. Remove the three screws, then remove the side sill
trim.
5. Remove the under-dash fuse box mounting bolts.
Removal/Installation
6. Disconnect the under-dash fuse box connectors.
NOTE: The SRS main harness connector is double
locked. To remove it, first lift the connector lid,
then press the connector tab down and pull the
connector out.
Installation:
1. Connect the connectors to the under-dash fuse
box.
NOTE: To reinstall the SRS main harness connec-
tor, push it into position until it clicks, then close
the connector lid.
2. Install the under-dash fuse box.
3. Install the side sill trim, fuse box door and door sill
pad.
4. Connect both the negative cable and positive cable
to the battery.
5. Confirm that all systems work properly.
7. Take out the under-dash fuse box.
TABLID
SRS FUSE
No. 1 (10 A)
SRS MAIN HARNESS
SIDE SILL TRIM
FUSE BOX
DOOR
SIDE SILL PAD