2ND CLUTCH
ASSEMBLY
FEELER GAUGE
2ND GEAR
3RD GEAR
THRUST WASHER
THRUST NEEDLE
BEARING
SECONDARY SHAFT/
3RD GEAR
Push this direction.
THRUST NEEDLE
BEARING
NEEDLE BEARING
2ND GEAR
THRUST NEEDLE
BEARING
THRUST WASHER
2ND CLUTCH
ASSEMBLY
CHAMFER
2ND CLUTCH ASSEMBLY
SECONDARY SHAFT/
3RD GEAR
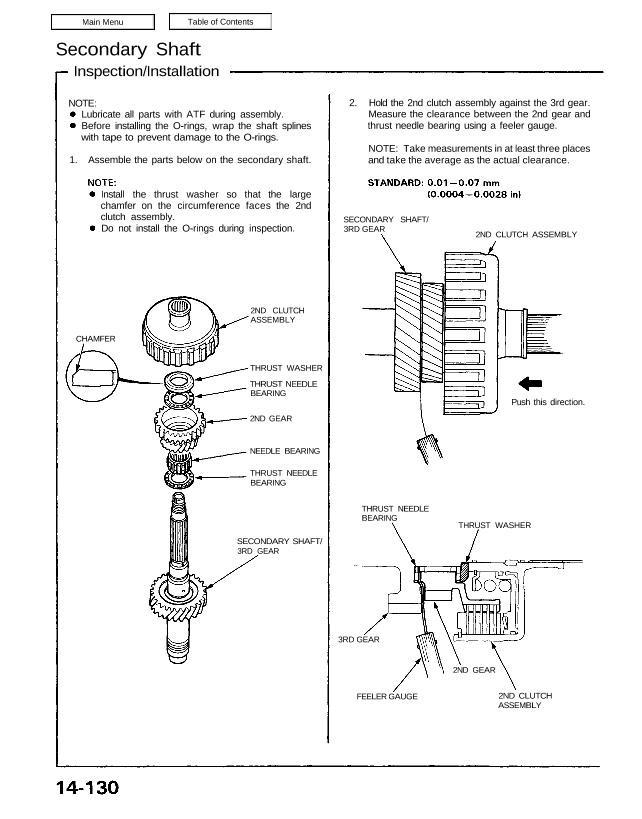
2. Hold the 2nd clutch assembly against the 3rd gear.
Measure the clearance between the 2nd gear and
thrust needle bearing using a feeler gauge.
NOTE: Take measurements in at least three places
and take the average as the actual clearance.
Secondary Shaft
Inspection/Installation
NOTE:
Lubricate all parts with ATF during assembly.
Before installing the O-rings, wrap the shaft splines
with tape to prevent damage to the O-rings.
1. Assemble the parts below on the secondary shaft.
Install the thrust washer so that the large
chamfer on the circumference faces the 2nd
clutch assembly.
Do not install the O-rings during inspection.
ASSEMBLY
FEELER GAUGE
2ND GEAR
3RD GEAR
THRUST WASHER
THRUST NEEDLE
BEARING
SECONDARY SHAFT/
3RD GEAR
Push this direction.
THRUST NEEDLE
BEARING
NEEDLE BEARING
2ND GEAR
THRUST NEEDLE
BEARING
THRUST WASHER
2ND CLUTCH
ASSEMBLY
CHAMFER
2ND CLUTCH ASSEMBLY
SECONDARY SHAFT/
3RD GEAR
2. Hold the 2nd clutch assembly against the 3rd gear.
Measure the clearance between the 2nd gear and
thrust needle bearing using a feeler gauge.
NOTE: Take measurements in at least three places
and take the average as the actual clearance.
Secondary Shaft
Inspection/Installation
NOTE:
Lubricate all parts with ATF during assembly.
Before installing the O-rings, wrap the shaft splines
with tape to prevent damage to the O-rings.
1. Assemble the parts below on the secondary shaft.
Install the thrust washer so that the large
chamfer on the circumference faces the 2nd
clutch assembly.
Do not install the O-rings during inspection.
3. If the clearance is out of tolerance, select and in-
stall a new thrust washer.
THRUST WASHER
THRUST WASHER
4. After replacing the thrust washer, make sure that
the clearance is within tolerance.