Replacement
SRS components are located in this area. Review the
SRS component locations, precautions, and procedures
in the SRS section 24 before performing repairs or ser-
vice.
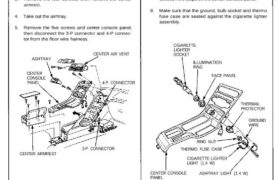
1. Remove the clock (see page 23-231).
2. Remove the two screws behind the clock, then
remove the center air vent (see section 20).
3. Remove the four screws, then remove the center
armrest.
4. Take out the ashtray.
5. Remove the five screws and center console panel,
then disconnect the 3-P connector and 4-P connec-
tor from the floor wire harness.
ASHTRAY
CENTER
CONSOLE
PANEL
CENTER AIR VENT
4-P CONNECTOR
3-P CONNECTOR
CENTER ARMREST
6. Disconnect the thermo fuse case from the end of
the cigarette lighter socket.
7. Remove the ring nut, and separate the cigarette
lighter socket from the thermal protector.
8. When installing the cigarette lighter, align each lug
on the face panel, illumination ring and cigarette
lighter socket with the groove in the hole, then posi-
tion the bulb housing on the thermal protector
between the stops on the center console panel.
9. Make sure that the ground, bulb socket and thermo
fuse case are seated against the cigarette lighter
assembly.
CIGARETTE
LIGHTER
SOCKET
ILLUMINATION
RING
FACE PANEL
THERMAL
PROTECTOR
GROUND
WIRE
CENTER CONSOLE
PANEL
ASHTRAY LIGHT (1.4 W)
RING NUT
THERMO FUSE CASE
CIGARETTE LIGHTER
LIGHT (1.4 W)
SRS components are located in this area. Review the
SRS component locations, precautions, and procedures
in the SRS section 24 before performing repairs or ser-
vice.
1. Remove the clock (see page 23-231).
2. Remove the two screws behind the clock, then
remove the center air vent (see section 20).
3. Remove the four screws, then remove the center
armrest.
4. Take out the ashtray.
5. Remove the five screws and center console panel,
then disconnect the 3-P connector and 4-P connec-
tor from the floor wire harness.
ASHTRAY
CENTER
CONSOLE
PANEL
CENTER AIR VENT
4-P CONNECTOR
3-P CONNECTOR
CENTER ARMREST
6. Disconnect the thermo fuse case from the end of
the cigarette lighter socket.
7. Remove the ring nut, and separate the cigarette
lighter socket from the thermal protector.
8. When installing the cigarette lighter, align each lug
on the face panel, illumination ring and cigarette
lighter socket with the groove in the hole, then posi-
tion the bulb housing on the thermal protector
between the stops on the center console panel.
9. Make sure that the ground, bulb socket and thermo
fuse case are seated against the cigarette lighter
assembly.
CIGARETTE
LIGHTER
SOCKET
ILLUMINATION
RING
FACE PANEL
THERMAL
PROTECTOR
GROUND
WIRE
CENTER CONSOLE
PANEL
ASHTRAY LIGHT (1.4 W)
RING NUT
THERMO FUSE CASE
CIGARETTE LIGHTER
LIGHT (1.4 W)