Starter Test
NOTE: The air temperature must be between 59 and
100°F (15 and 38°C) before testing.
Recommended Procedure:
• Use a starter system tester.
• Connect and operate the equipment in accor-
dance with manufacturer’s instructions.
Alternate Procedure:
• Use the following equipment:
– Ammeter, 0-400 A
– Voltmeter, 0-20 V (accurate within 0.1
volt)
– Tachometer, 0—1200 rpm
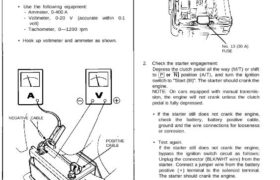
• Hook up voltmeter and ammeter as shown.
NEGATIVE CABLE
POSITIVE
CABLE
1. Disconnect the No. 13 (30 A) fuse from the engine
compartment fuse/relay box.
No. 13 (30 A)
FUSE
2. Check the starter engagement:
Depress the clutch pedal all the way (M/T) or shift
to position (A/T), and turn the ignition
switch to “Start (III)”. The starter should crank the
engine.
NOTE: On cars equipped with manual transmis-
sion, the engine will not crank unless the clutch
pedal is fully depressed.
• If the starter still does not crank the engine,
check the battery, battery positive cable,
ground and the wire connections for looseness
or corrosion.
• Test again.
If the starter still does not crank the engine,
bypass the ignition switch circuit as follows:
Unplug the connector (BLK/WHT wire) from the
starter. Connect a jumper wire from the battery
positive (+ ) terminal to the solenoid terminal.
The starter should crank the engine.
SOLENOID TERMINAL
BLK/WHT
WIRE
– If the starter still does not crank the engine,
remove the starter and diagnose its internal
problems.
– If the starter cranks the engine, check for an
open in the BLK/WHT wire and connectors be-
tween the starter and ignition switch. Check the
ignition switch.
On cars with automatic transmission, check the
A/T gear position switch (neutral position
switch) and connector.
On cars with manual transmission, check the
starter cut relay, clutch interlock switch and
connectors.
NOTE: Check the No. 29 (50 A) fuse and the
starter cut relay, and inspect the security alarm
system.
3. Check for wear or damage:
The starter should crank the engine smoothly and
steadily.
If the starter engages, but cranks the engine er-
ratically, remove the starter motor. Inspect the
starter, drive gear and flywheel ring gear for
damage.
Check the drive gear overrunning clutch for binding
or slipping when the armature is rotated with the
drive gear held. Replace the gears if damaged.
4. Check cranking voltage and current draw:
Voltage should be no less than 8.5 volts.
Current should be no more than 350 amperes.
If voltage is too low, or current draw too high,
check for:
• Low battery.
• Open circuit in starter armature commutator
segments.
• Starter armature dragging.
• Shorted armature winding.
• Excessive drag in engine.
5. Check cranking rpm:
Engine speed during cranking should be above 100
rpm.
If speed is too low, check for:
Loose battery or starter terminals.
Excessively worn starter brushes.
Open circuit in commutator segments.
Dirty or damaged helical spline or drive gear.
Defective drive gear overrunning clutch.
6. Check the starter disengagement:
Depress the clutch pedal all the way (M/T) or shift
to position (A/T), turn the ignition switch
to “Start (III)” and release to ON (II).
The starter drive gear should disengage from the
flywheel ring gear.
If the drive gear hangs up on the flywheel ring gear,
check:
• Solenoid plunger and switch for malfunction.
• Drive gear assembly for dirt or damaged over-
running clutch.