Adjustment
NOTE: When the following parts have been replaced or
removed, this adjustment should be done.
• Roof side seals
• Roof side lock units
• Front and rear pillar seals
CAUTION: To prevent damage, place the roof on an
appropriate pad.
1. Remove the roof front trim and roof side trim (see
page 20-82).
2. Install the roof side lock handle.
3. Turn the roof side lock handle to the locked posi-
tion.
4. Loosen the roof side lock unit mounting nuts, then
tighten them lightly.
ROOF SIDE
LOCK HANDLE
ROOF SIDE
LOCK UNIT
NUTS
6 x 1.0 mm
11 N-m (1.1 kg-m,
8 Ib-ft)
Loosen.
NUTS
6 x 1.0 mm
11 N-m (1.1 kg-m,
8 Ib-ft)
Loosen.
5. Return the roof side lock handle to the unlocked posi-
tion.
6. Remove the front and rear roof rail trim (see page
20-79).
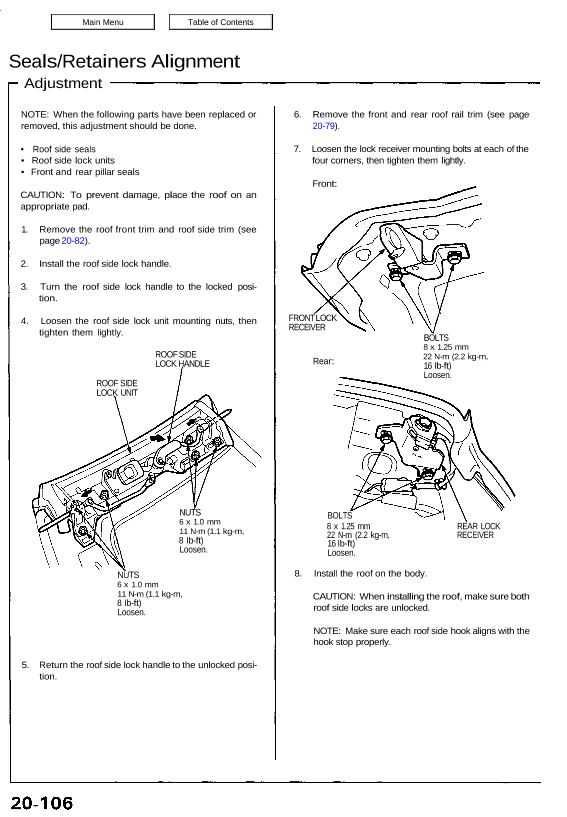
7. Loosen the lock receiver mounting bolts at each of the
four corners, then tighten them lightly.
Front:
FRONT LOCK
RECEIVER
Rear:
BOLTS
8 x 1.25 mm
22 N-m (2.2 kg-m,
16 Ib-ft)
Loosen.
BOLTS
8 x 1.25 mm REAR LOCK
22 N-m (2.2 kg-m, RECEIVER
16 Ib-ft)
Loosen.
8. Install the roof on the body.
CAUTION: When installing the roof, make sure both
roof side locks are unlocked.
NOTE: Make sure each roof side hook aligns with the
hook stop properly.
ROOF
ROOF SIDE
HOOK
HOOK STOP
9. Secure the roof by turning both roof side lock han-
dles. Make sure they are locked securely.
NOTE: Turn each roof side lock handle until a faint
click is heard.
ROOF SIDE
LOCK HANDLE
REAR LOCK
RECEIVER
FRONT LOCK
RECEIVER
10. Check the seal and retainer alignment.
• Each seal joint fits flush.
• Each retainer aligns.
11. Adjust the seal and retainer alignment by moving
both roof side lock units in or out.
NOTE: Align the roof side retainer with the front pillar
retainer and rear pillar panel evenly on each side, and
make the seals fit flush.
ROOF SIDE
LOCK UNIT
REAR PILLAR
PANEL
ROOF
FRONT PILLAR
RETAINER
REAR PILLAR
SEAL
ROOF SIDE
SEAL
FRONT PILLAR
SEAL
Front:
FRONT PILLAR
RETAINER
ROOF
ROOF SIDE
RETAINER
FRONT PILLAR
SEAL
ROOF SIDE
SEAL
ROOF SIDE
RETAINER
Seals/Retainers Alignment
Adjustment
Rear:
ROOF SIDE
RETAINER
ROOF REAR PILLAR
PANEL
ROOF SIDE
SEAL REAR PILLAR
SEAL
12. Tighten the roof side lock unit mounting nuts and
lock receiver mounting bolts.
13. If you need to adjust the rear end of the roof side seal
to fit against the rear pillar seal, remove the roof,
then adjust the rear end of the roof side seal with a
shim.
NOTE:
• Remove the rear end of the roof side seal, then
install the shim.
• Install the roof side seal securely as described on
page 20-85.
SHIM
Thickness:
1.6 mm (0.063 in)
ROOF SIDE
SEAL
14. Check the height of the roof with the body.
If necessary, loosen the lock receiver mounting bolts,
then adjust the height of the roof to make the roof fit
flush with the body by using shims.
Thickness: 1.0 mm (0.039 in)
Front:
FRONT LOCK
RECEIVER
Rear:
REAR LOCK
RECEIVER
15. Tighten the lock receiver mounting bolts.
16. Check that each roof side lock handle works
smoothly.
17. Remove the roof.
18. If the roof side retainer has not been replaced, and
or the EPT sealer on the roof side retainer has not
been replaced, do the following (see page 20-84):
a. Remove the roof side seal and roof side retainer
from the roof.
b. Replace the EPT sealer on the roof side retainer
and roof.
c. Replace the butyl tapes on the roof side seal.
d. Reinstall the roof side retainer, then apply new
sealant.
e. Reinstall the roof side seal.
19. Check the lips of the roof side seal, and glue the
peeled lip securely with sealant, then wipe the
excess sealant off with a soft shop towel dampened
with alcohol.
20. After applying the sealant, let the roof stand for at
least three hours.
21. Install the roof on the body, then make sure the
seals fit flush.
NOTE: Make sure both roof side lock handles are
locked securely.
22. Check that the door glass contacts the seal evenly
as follows:
a. Raise the door glass fully, and close the door.
b. Mark a line on the door glass using a thin plastic
plate as shown.
c. Open the door, then check that there is 1 – 3 mm
(0.039-0.12 in) between the door glass edge
and the a line around the front pillar and roof.
d. If necessary, adjust the door glass (see page
20-14).
RETAINER
PLASTIC
PLATE
1 – 3 mm
(0.039-0.12 in)
SEAL
MEASURING AREA
DOOR
GLASS
DOOR
GLASS
DOOR
GLASS
23. Check for water leaks (see page 20-110).
24. Remove the roof, then reinstall all remaining removed
parts.