Removal
CAUTION:
Wear gloves to remove and install the rear window.
Since the rear window is double glazed glass with the
Inner glass (interior-side) larger than the outer glass,
care should be taken not to damege the edge of the
inner glass when removing the outer glass.
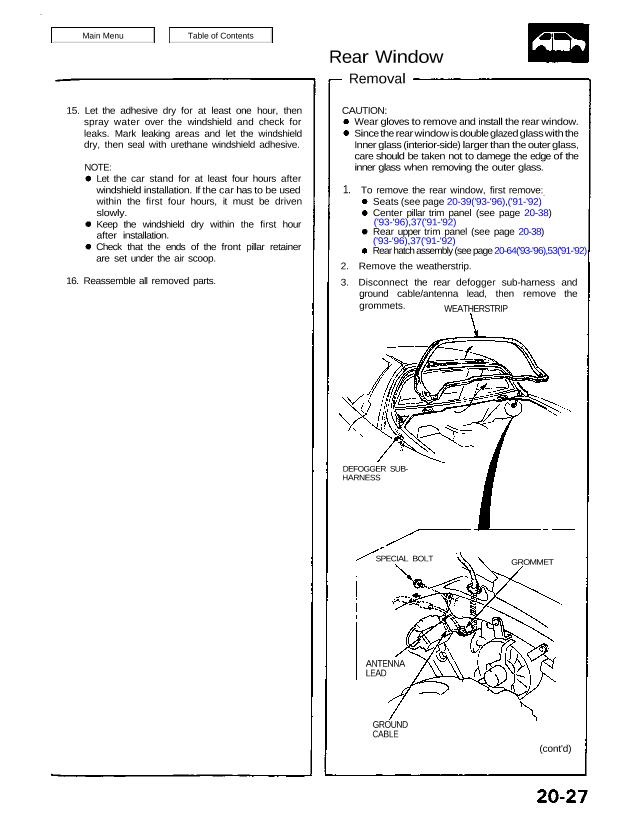
To remove the rear window, first remove:
Seats (see page 20-39(’93-’96),(’91-’92)
Center pillar trim panel (see page 20-38)
(’93-’96),37(’91-’92)
Rear upper trim panel (see page 20-38)
(’93-’96),37(’91-’92)
Rear hatch assembly (see page 20-64(’93-’96),53(’91-’92)
2. Remove the weatherstrip.
3. Disconnect the rear defogger sub-harness and
ground cable/antenna lead, then remove the
grommets. WEATHERSTRIP
DEFOGGER SUB-
HARNESS
GROMMET
(cont’d)
GROUND
CABLE
ANTENNA
LEAD
SPECIAL BOLT
15. Let the adhesive dry for at least one hour, then
spray water over the windshield and check for
leaks. Mark leaking areas and let the windshield
dry, then seal with urethane windshield adhesive.
NOTE:
Let the car stand for at least four hours after
windshield installation. If the car has to be used
within the first four hours, it must be driven
slowly.
Keep the windshield dry within the first hour
after installation.
Check that the ends of the front pillar retainer
are set under the air scoop.
16. Reassemble all removed parts.
1.
Rear Window
Removal
4. Remove the rear defogger sub-harness and ground
cable/antenna lead from the upper molding.
UPPER MOLDING
REAR DEFOGGER
SUB-HARNESS
GROUND CABLE/
ANTENNA LEAD
5. Use a knife to cut the upper and lower moldings
from outside the car, all the way around.
CAUTION: Take care not to scratch or score the
rear window and body.
UPPER MOLDING
Replace.
REAR WINDOW
LOWER
MOLDING
Replace.
NOTE: Cut the outer side rubber portion
molding, then cut the top rubber portion
6. Apply protective tape along the edge of the body.
7. Using an awl, make a hole through the adhesive
from inside the car. Push piano wire through the
hole, and wrap each end around a piece of wood.
8. Pull the piano wire back and forth in a sawing motion,
and carefully cut through the adhesive around the
entire rear window.
CAUTION: Hold the piano wire as close to the rear
window as possible to prevent damage to the
body.
PROTECTIVE
TAPE
PIANO WIRE
ADHESIVE
REAR WINDOW
ADHESIVE
PROTECTIVE
TAPE
PIANO
WIRE
off the