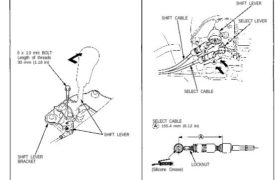
Cable Adjustment
1. Remove the center console panel (see section 20).
2. Move the shift lever into 1st gear.
3. Install the 6 mm bolt to the shift lever.
NOTE: While moving the shift lever back and
forth, and right and left, tighten the bolt until the
range of free play of the shift lever is 1 —2 mm.
6 x 1.0 mm BOLT
Length of threads
30 mm (1.18 in)
SHIFT LEVER
SHIFT LEVER
BRACKET
4. Remove the transmission lower cover.
5. Disconnect the select and shift cables from the
transmission, then remove the cable bracket with
the select and shift cables.
6. Remove the select and shift cables from the cable
bracket.
7. Measure the distances
NOTE:
• Hold the cable ends up to the select and shift
levers as if they were connected to them.
• Adjust by loosening the locknut at the cable end
and turning the cable end.
SHIFT LEVER
SHIFT CABLE SELECT LEVER
SELECT CABLE
SELECT CABLE
155.4 mm (6.12 in)
LOCKNUT
(Silicone Grease)
SHIFT CABLE
178.5 mm (7.03 in)
LOCKNUT
(Silicone Grease)
8. Install in the reverse order of removal.
9. After installing, check operation of the shift lever.
