Clutch Master Cylinder
Removal
1. Disconnect the clutch pipe from the clutch master
cylinder.
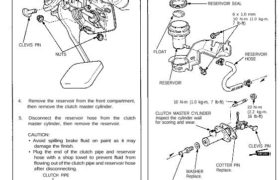
2. Pry out the cotter pin, and pull the clevis pin out of
the clevis.
3. Remove the nuts. COTTER PIN
Replace.
CLEVIS PIN
4. Remove the reservoir from the front compartment,
then remove the clutch master cylinder.
5. Disconnect the reservoir hose from the clutch
master cylinder, then remove the reservoir.
CAUTION:
• Avoid spilling brake fluid on paint as it may
damage the finish.
• Plug the end of the clutch pipe and reservoir
hose with a shop towel to prevent fluid from
flowing out of the clutch pipe and reservoir hose
after disconnecting.
CLUTCH PIPE
CLUTCH
MASTER
CYLINDER
RESERVOIR HOSE
RESERVOIR
Installation
1. Install the clutch master cylinder in the reverse
order of removal.
NOTE: Bleed the clutch hydraulic system (see
page 12-6).
RESERVOIR CAP
RESERVOIR SEAL
6 x 1.0 mm
10 N-m (1.0 kg-m,
7 Ib-ft)
FLOAT
RESERVOIR
10 N-m (1.0 kg-m, 7 Ib-ft)
CLUTCH MASTER CYLINDER
Inspect the cylinder wall
for scoring and wear.
RESERVOIR
HOSE
22 N-m
(2.2 kg-m,
16 Ib-ft)
COTTER PIN
Replace.
HOSE JOINT
10 N-m (1.0 kg-m, 7 Ib-ft)
NUTS
CLEVIS PIN
WASHER
Replace.
Removal
1. Disconnect the clutch pipe from the clutch master
cylinder.
2. Pry out the cotter pin, and pull the clevis pin out of
the clevis.
3. Remove the nuts. COTTER PIN
Replace.
CLEVIS PIN
4. Remove the reservoir from the front compartment,
then remove the clutch master cylinder.
5. Disconnect the reservoir hose from the clutch
master cylinder, then remove the reservoir.
CAUTION:
• Avoid spilling brake fluid on paint as it may
damage the finish.
• Plug the end of the clutch pipe and reservoir
hose with a shop towel to prevent fluid from
flowing out of the clutch pipe and reservoir hose
after disconnecting.
CLUTCH PIPE
CLUTCH
MASTER
CYLINDER
RESERVOIR HOSE
RESERVOIR
Installation
1. Install the clutch master cylinder in the reverse
order of removal.
NOTE: Bleed the clutch hydraulic system (see
page 12-6).
RESERVOIR CAP
RESERVOIR SEAL
6 x 1.0 mm
10 N-m (1.0 kg-m,
7 Ib-ft)
FLOAT
RESERVOIR
10 N-m (1.0 kg-m, 7 Ib-ft)
CLUTCH MASTER CYLINDER
Inspect the cylinder wall
for scoring and wear.
RESERVOIR
HOSE
22 N-m
(2.2 kg-m,
16 Ib-ft)
COTTER PIN
Replace.
HOSE JOINT
10 N-m (1.0 kg-m, 7 Ib-ft)
NUTS
CLEVIS PIN
WASHER
Replace.