Category: Heating, Ventilation and Air Conditioning
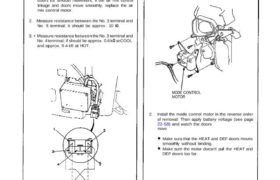
Test 1. Connect battery power to the No. 1 terminal of the air mix control motor, then connect ground to the No. 2 terminal; the air mix control motor should run, and stop at HOT, If it doesn’t, reverse the connections; the air mix control motor should run, and stop at COOL. NOTE: If the […]
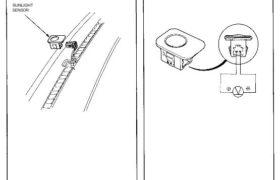
Sunlight Sensor Removal With a small screwdriver, carefully pry the sunlight sen- sor out of the dashboard and disconnect its connector. Protect the dashboard; cover it with a shop towel before you pry against it. SUNLIGHT SENSOR Test Measure the voltage between the terminals with the sen- sor out of direct sunlight. • With the […]
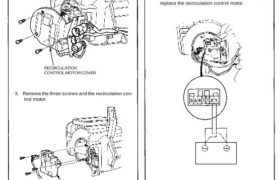
Recirculation Control Motor Replacement 1. Remove the blower unit (see page 22-67) 2. Remove the three screws and the recirculation con- trol motor cover from the blower unit. RECIRCULATION CONTROL MOTOR COVER 3. Remove the three screws and the recirculation con- trol motor. RECIRCULATION CONTROL MOTOR 4. Install the recirculation control motor in the reverse […]
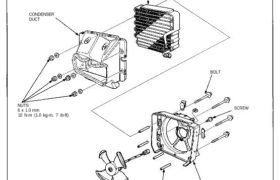
Condenser Overhaul 1. Remove the four bolts and nuts. Then separate the condenser duct from the condenser shroud, and remove the condenser. 2. Remove the three mounting screws, then remove the condenser fan from the condenser shroud. CONDENSER New parts (R-134a) CONDENSER DUCT NUTS 6 x 1.0 mm 10 N-m (1.0 kg-m, 7 Ib-ft) SPACER […]
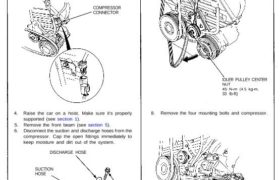
Replacement 1. If the compressor still works, run the engine at idle for a few minutes with the A/C on, then shut the engine off and disconnect the negative cable from the battery. 2. Recover the refrigerant using a R-134a refrigerant Recovery/Recycling/Charging System. (see page 22-73). 3. Disconnect the compressor connector. COMPRESSOR CONNECTOR 4. Raise […]
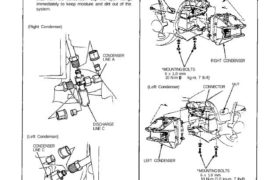
Replacement 1. Disconnect the negative cable from the battery. 2. Remove the from bumper (see section 20). 3. Recover the refrigerant using a R-134a refrigerant Recover/Recycling/Charging System (see page 22-73). 4. Disconnect the discharge line C and the condenser lines from the condenser. Cap the open fittings immediately to keep moisture and dirt out of […]
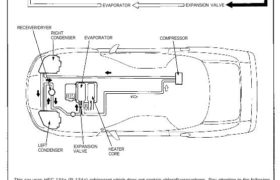
Description Outline The air conditioning removes the heat from the passenger compartment via the route shown below. Using the refrigerant (R134a) Section/compression High temperature/ high pressure gas COMPRESSOR I Radiation of heat RIGHT/LEFT CONDENSER Less moisturized low pressure vapor High temperature/ High temperature/ high pressure liquid Traps debris and acts high pressure liquid as an […]
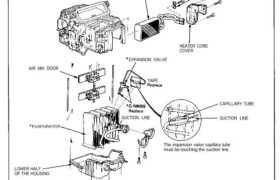
Heater-Evaporator Unit Overhaul 1. Remove the heater core cover, remove the pipe clamp, then pull out the heater core. 2. Remove the lower half of the housing, then remove the evaporator. 3. Remove the expansion valve if necessary. HEATER CORE PIPE CLAMP AIR MIX DOOR LOWER HALF OF THE HOUSING CAPILLARY TUBE SUCTION LINE *EVAPORATOR […]
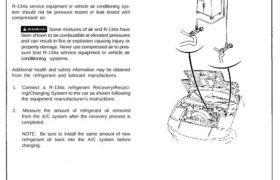
Recovery Only use service equipment that is U.L.-listed and is cer- tified to meet the requirements of SAE J2210 to remove HFC-134a (R-134a) from the air conditioning system. CAUTION: Exposure to air conditioner refrigerant and lubricant vapor or mist can irritate eyes, nose and throat. Avoid breathing the air conditioner refrigerant and lubricant vapor or […]
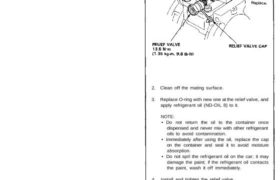
Relief Valve Replacement 1. Remove the relief valve and O-ring. Don’t let any refrigerant oil run out. NOTE: Be sure to use the right O-rings for R-134a. 2. Clean off the mating surface. 3. Replace O-ring with new one at the relief valve, and apply refrigerant oil (ND-OIL 8) to it. NOTE: • Do not […]