Category: Electrical
nsxb23139a.pdf
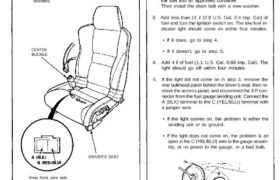
Seat Belt Reminder System Seat Belt Switch Test 1. Slide the driver’s seat all the way forward, then dis- connect the 2-P connector from the seat belt switch. 2. Check continuity between the A and B terminals with the driver’s seat belt buckled and unbuckled. • There should be no continuity with the driver’s seat […]
nsxb23126a.pdf
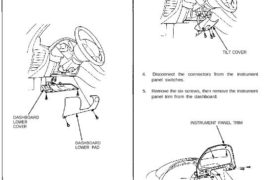
Gauge Assembly Removal SRS components are located in this area. Review the SRS component locations, precautions, and procedures in the SRS section 24 before performing repairs or service. 1. Remove the dashboard lower cover, and disconnect the floor wire harness connectors. 2. Remove the two screws, then remove the dashboard lower pad from the dashboard. […]
nsxb23136a.pdf
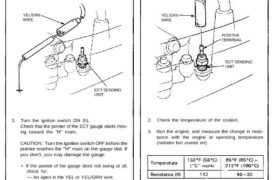
Engine Coolant Temperature (ECT) Gauge ECT Gauge Test 1. Before testing, check the No. 5 (1 5 A) fuse in the under-dash fuse box. 2. Make sure the ignition switch is OFF, then discon- nect the YEL/GRN wire from the ECT sending unit and ground it with a jumper wire. YEL/GRN WIRE ECT SENDING UNIT […]
nsxb23142a.pdf
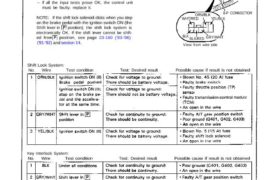
Interlock System Control Unit Input Test Disconnect the 8-P connector from the control unit. Inspect the connector and socket terminals to be sure they are all making good contact. If the terminals are bent, loose, or corroded, repair them as necessary, and recheck the system. If the terminals look OK, make the following input tests […]
nsxb23143a.pdf
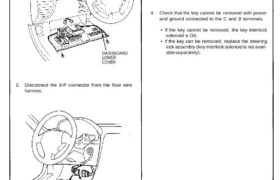
Key Interlock Solenoid Test 1. Remove the dashboard lower cover, and disconnect the floor wire harness connectors. DASHBOARD LOWER COVER 2. Disconnect the 8-P connector from the floor wire harness. View from wire side 3. Check for continuity between the terminals in each switch position according to the table. 4. Check that the key cannot […]
nsxd23009a.pdf
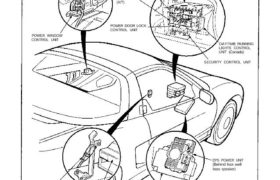
Dashboard, Door and Floor DRIVER’S DOOR PANEL POWER WINDOW CONTROL UNIT CIGARETTE LIGHTER RELAY SRS UNIT FOOT WELL BASS SPEAKER RIGHT FRONT FLOOR PANEL EPS POWER UNIT (Behind foot well bass speaker) SECURITY CONTROL UNIT DAYTIME RUNNING LIGHTS CONTROL UNIT (Canada) ABS CONTROL UNIT CRUISE CONTROL UNIT EPS CONTROL UNIT (A/T) POWER DOOR LOCK CONTROL […]
nsxd23299a.pdf
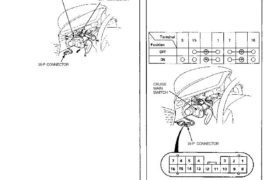
5. Remove the four screws and remove the combina- tion light switch (main switch). COMBINATION LIGHT SWITCH 10-P CONNECTOR 16-P CONNECTOR Main Switch Test 1. Remove the dashboard lower panel and knee bolster pad. 2. If necessary, remove the knee bolster. 3. Disconnect the 16-P connector and check for con- tinuity between the terminals in […]
nsxb23260a.pdf
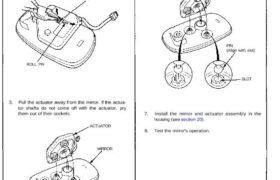
Power Mirrors Door Mirror Actuator Replacement 1. Remove the mirror and actuator assembly from the housing (see section 20). 2. Place the mirror on a flat, padded surface. Pull up on the spring-loaded lug, and remove the roll pin. LUG ROLL PIN 3. Pull the actuator away from the mirror. If the actua- tor shafts […]
nsxe23011a.pdf
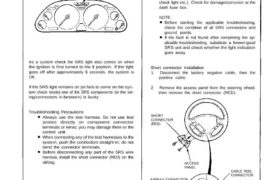
Supplemental Restraint System (SRS) Self-diagnosis Function The SRS unit includes a self-diagnosis function. If there is a failure in the sensors, SRS unit, inflator, or their cir- cuits, the SRS light in the instrument panel goes ON. SRS INDICATOR LIGHT As a system check the SRS light also comes on when the ignition is first […]
nsxb23194a.pdf
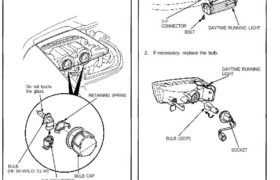
Headlights Bulb Replacement CAUTION: • Halogen headlights can become very hot in use; do not touch them or the attaching hardware immediately after they have been turned off. • Do not try to replace or clean the headlights with the lights on. 1. Remove the bulb cap. BULB (HI: 60 W/LO: 51 W) BULB CAP […]