Seat Belt Reminder System
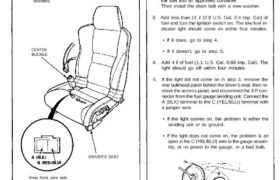
Seat Belt Switch Test
1. Slide the driver’s seat all the way forward, then dis-
connect the 2-P connector from the seat belt switch.
2. Check continuity between the A and B terminals with
the driver’s seat belt buckled and unbuckled.
• There should be no continuity with the driver’s
seat belt buckled.
• There should be continuity with the seat belt un-
buckled.
CENTER
BUCKLE
DRIVER’S SEAT
View from wire side
Low Fuel Indicator
Indicator Light Test
1. Park the car on level ground.
Do not smoke while working on the
fuel system. Keep open flame away from the work
area. Drain fuel only into an approved container.
2. Remove the drain bolt from the fuel tank, and drain
the fuel into an approved container.
Then install the drain bolt with a new washer.
3. Add less than 11 (2.9 U.S. Gal, 2.4 Imp. Gal) of
fuel and turn the ignition switch on. The low fuel in-
dicator light should come on within four minutes.
• If it does, go to step 4.
• If it doesn’t, go to step 5.
4. Add 4 of fuel (1.1 U.S. Gal, 0.88 Imp. Gal). The
light should go off within four minutes.
5. If the light did not come on in step 3, remove the
rear bulkhead panel behind the driver’s seat, then re-
move the access panel, and disconnect the 3-P con-
nector from the fuel gauge sending unit. Connect the
A (BLK) terminal to the C (YEL/BLU) terminal with
a jumper wire.
• If the light comes on, the problem is either the
sending unit or its ground.
• If the light does not come on, the problem is an
open in the C (YEL/BLU) wire to the gauge assem-
bly, or no power to the gauge, or a bad bulb.
ACCESS
PANEL
3-P CONNECTOR
B (YEL/WHT)
A (BLK)
C (YEL/BLU)
