Fuel Supply System
Replacement
Fuel Tank
Do not smoke while working on fuel system. Keep open flame away from your work area.
Make sure lifts are placed properly (see page 1-9).
1. Raise the car.
2. Remove the drain bolt and drain the fuel into an approved container.
3. Remove the center rod (see section 5).
4. Disconnect the M/T shift cable and M/T clutch cable or A/T shift cable from the transmission (see section 14).
5. Remove the seat back panels (see section 20) and access panel.
6. Disconnect the C489 (6P) connector.
7. Disconnect the hoses.
CAUTION:
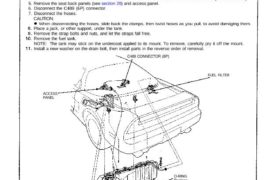
TANK STRAPS
O-RING
Replace.
DRAIN BOLT
50 N.m (5.0 kg-m, 36 Ib-ft)
LOCKNUT
21 N.m (2.1 kg-m,
15 Ib-ft)
MOUNTING BOLT
39 N.m (3.9 kg-m,
28 Ib-ft)
FUEL FILTER
C489 CONNECTOR (6P)
ACCESS
PANEL
When disconnecting the hoses, slide back the clamps, then twist hoses as you pull, to avoid damaging them.
Place a jack, or other support, under the tank.
Remove the strap bolts and nuts, and let the straps fall free.
Remove the fuel tank.
NOTE: The tank may stick on the undercoat applied to its mount. To remove, carefully pry it off the mount.
Install a new washer on the drain bolt, then install parts in the reverse order of removal.
