Compressor
Clutch Overhaul
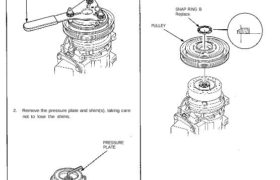
1. Remove the center bolt while holding the pressure
plate.
CENTER BOLT
12 N-m (1.2 kg-m, 9 Ib-ft)
A/C CLUTCH HOLDER
Commercially available
Robinair: P/N 10204
Kent-Moore: P/N J37872
2. Remove the pressure plate and shim(s), taking care
not to lose the shims.
PRESSURE
PLATE
SHIM(S)
3. Use snap ring pliers to remove snap ring B, then
remove the pulley.
NOTE:
• Be careful not to damage the pulley and com-
pressor during removal/installation.
• Once the snap ring B was removed, replace it
with a new one.
SNAP RING B
Replace.
PULLEY
4. Remove the snap ring A and the field coil.
NOTE:
• Be careful not to damage the field coil and com-
pressor during removal/installation.
• Once the snap ring A was removed, replace it
with a new one.
5. Install parts in the reverse order of removal, and:
• Install the field coil with the wire side facing
down (see above).
• Clean the pulley and compressor sliding surfaces
with non-petroleum solvent.
• Check the pulley bearings for excessive play.
• Make sure the snap rings are in the groove
properly.
• Apply locking agent to the threads on the center
bolt.
• Make sure that the pulley turns smoothly after it’s
reassembled.
