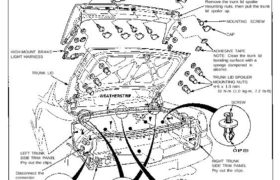
Trunk Lid Spoiler/Trunk Trim Panel
Replacement
NOTE:
• Take care not to scratch the trunk lid.
• Take care not to bend or scratch the trim panels.
CAUTION: When prying with a flat tip screwdriver,
wrap it with protective tape or a shop towel to prevent
damage. Disconnect the connector.
HIGH-MOUNT BRAKE LIGHT
Carefully pry out the caps with a flat tip
screwdriver, and remove the mounting screws.
HIGH-MOUNT BRAKE
LIGHT HARNESS
TRUNK LID
TRUNK LID SPOILER
Remove the trunk lid spoiler
mounting nuts, then pull the trunk
lid spoiler up.
MOUNTING SCREW
CAP
ADHESIVE TAPE
NOTE: Clean the trunk lid
bonding surface with a
sponge dampened in
alcohol.
TRUNK LID SPOILER
MOUNTING NUTS
6 x 1.0 mm
10 N-m (1.0 kg-m, 7.2 Ib-ft)
SCREW
LEFT TRUNK
SIDE TRIM PANEL
Pry out the clips.
Disconnect the
connector.
RIGHT TRUNK
SIDE TRIM PANEL
Pry out the clips.
WEATHERSTRIP
CLIP (10)
TRUNK FLOOR
TRIM PANEL HOOK
Pry out the clips and
loosen the screws, then
pry out the clips.
Installation is the reverse of the removal procedure.
NOTE:
• If necessary, replace any damaged clips.
• Make sure the connector is connected properly.
TRUNK FLOOR
TRIM PANEL
HOOK
CORROSION RESISTANT NUT
WEATHER-
STRIP
